ImageJ main window.

One of the advantages of areaDetector is that it enables the use of generic image display clients that obtain their data via EPICS Channel Access or pvAccess and work with any detector. There are currently three such generic clients provided with the areaDetector distribution. The first two are plugins for the popular ImageJ Java-based image processing program. EPICS_AD_Viewer.java uses EPICS Channel Access, while EPICS_NTNDA_Viewer.java uses EPICS V4 pvAccess. The third is an IDL-based viewer which can be run without an IDL license under the IDL Virtual Machine. Because ImageJ is free and more widely available and used than IDL, future enhancements are more likely to be done on the ImageJ plugins rather than the IDL viewer. These viewers are contained in the areaDetector distribution in the ADViewers repository
In addition to the ImageJ viewer plugins, there is an ImageJ plugin to graphically define the detector/camera readout region, ROIs, and overlays (EPICS_AD_Controller.java). Another ImageJ plugin provided with areaDetector does realtime line profiles with Gaussian peak fitting (GaussianProfile.java).
These are plugin for the popular ImageJ program that can be used to display 2-dimensional array data. Both of these plugins were originally written by Tim Madden from APS. Both support all NDArray data types and color modes, i.e. Mono, RGB1 (pixel interleave), RGB2 (row interleave) and RGB3 (plane interleave). The plugin directory also includes a plugin written elsewhere for reading and writing netCDF files, so ImageJ can be used to display images and image sequences (movies) saved with the NDFileNetCDF plugin.
This plugin uses EPICS Channel Access to display images via waveform records that the NDStdArrays plugin sends to EPICS.
This plugin uses EPICS V4 pvAccess to display NTNDArrays that the NDPluginPva plugin sends to EPICS. The EPICS_NTNDA_Viewer has a number of significant advantages compared to the EPICS_AD_Viewer:
To use these ImageJ plugins do the following:
cp -r Viewers/ImageJ/EPICS_areaDetector /Applications/ImageJ/plugins
java -Djna.library.path=/home/epics/support/areaDetector/ADSupport/lib/linux-x86_64
            -jar ij.jar
However, ImageJ is normally started via an executable file
rather than a script invoking ij.jar on both Linux and Windows, and loading via
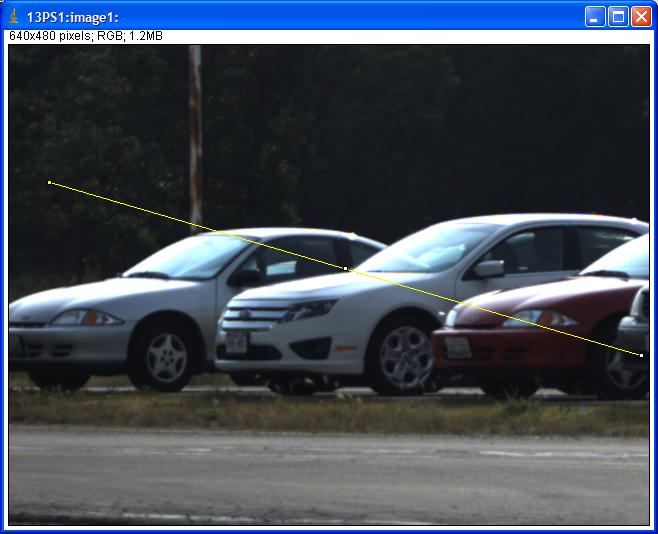
the above command requires other settings as well to make ImageJ work properly.The control windows for EPICS_AD_Viewer and EPICS_NTNDA_Viewer are shown below. The array dimensions and the number of frames per second actually being displayed by ImageJ is shown. There is a status window that shows whether the EPICS PVs are connected and the number of arrays received since the last update, which is every 2 seconds.
Press the Snap button to make a copy of the current frame in a new window. ImageJ can then be used to process, annotate, etc. that image.
To capture a sequence of images into an ImageJ "stack" select "Capture To Stack". The image sequence will be stored in the ImageJ buffer and a scroll bar will appear to allow you to scroll through the images. The stack can be saved to disk in a large number of formats, including AVI.
Note that beginning with ADCore R2-6 the plugins automatically resets the image image brightness and contrast when creating a new window. This will often provide a reasonable values. To optimize the brightness and contrast use the Image/Adjust/Brightness/Control menu in ImageJ. The keyboard shortcut for this is Control+Shift+C, which is worth remembering. Opening the Brightness and Contrast window will first do an autoscaling, which is often quite good. Pressing the Auto button repeatedly will step through several brightness/contrast settings.
The following is the main ImageJ window.
The following is the EPICS_AD_Viewer plugin control, located in the ImageJ "Plugins/EPICS_areaDetector/EPICS AD Viewer" menu.

The following is the EPICS_NTNDA_Viewer plugin control, located in the ImageJ "Plugins/EPICS_areaDetector/EPICS NTNDA Viewer" menu.

The following is the image display window, which will appear when the Start button is pressed in the EPICS_AD_Viewer or EPICS_NTNDA_Viewer control windows.
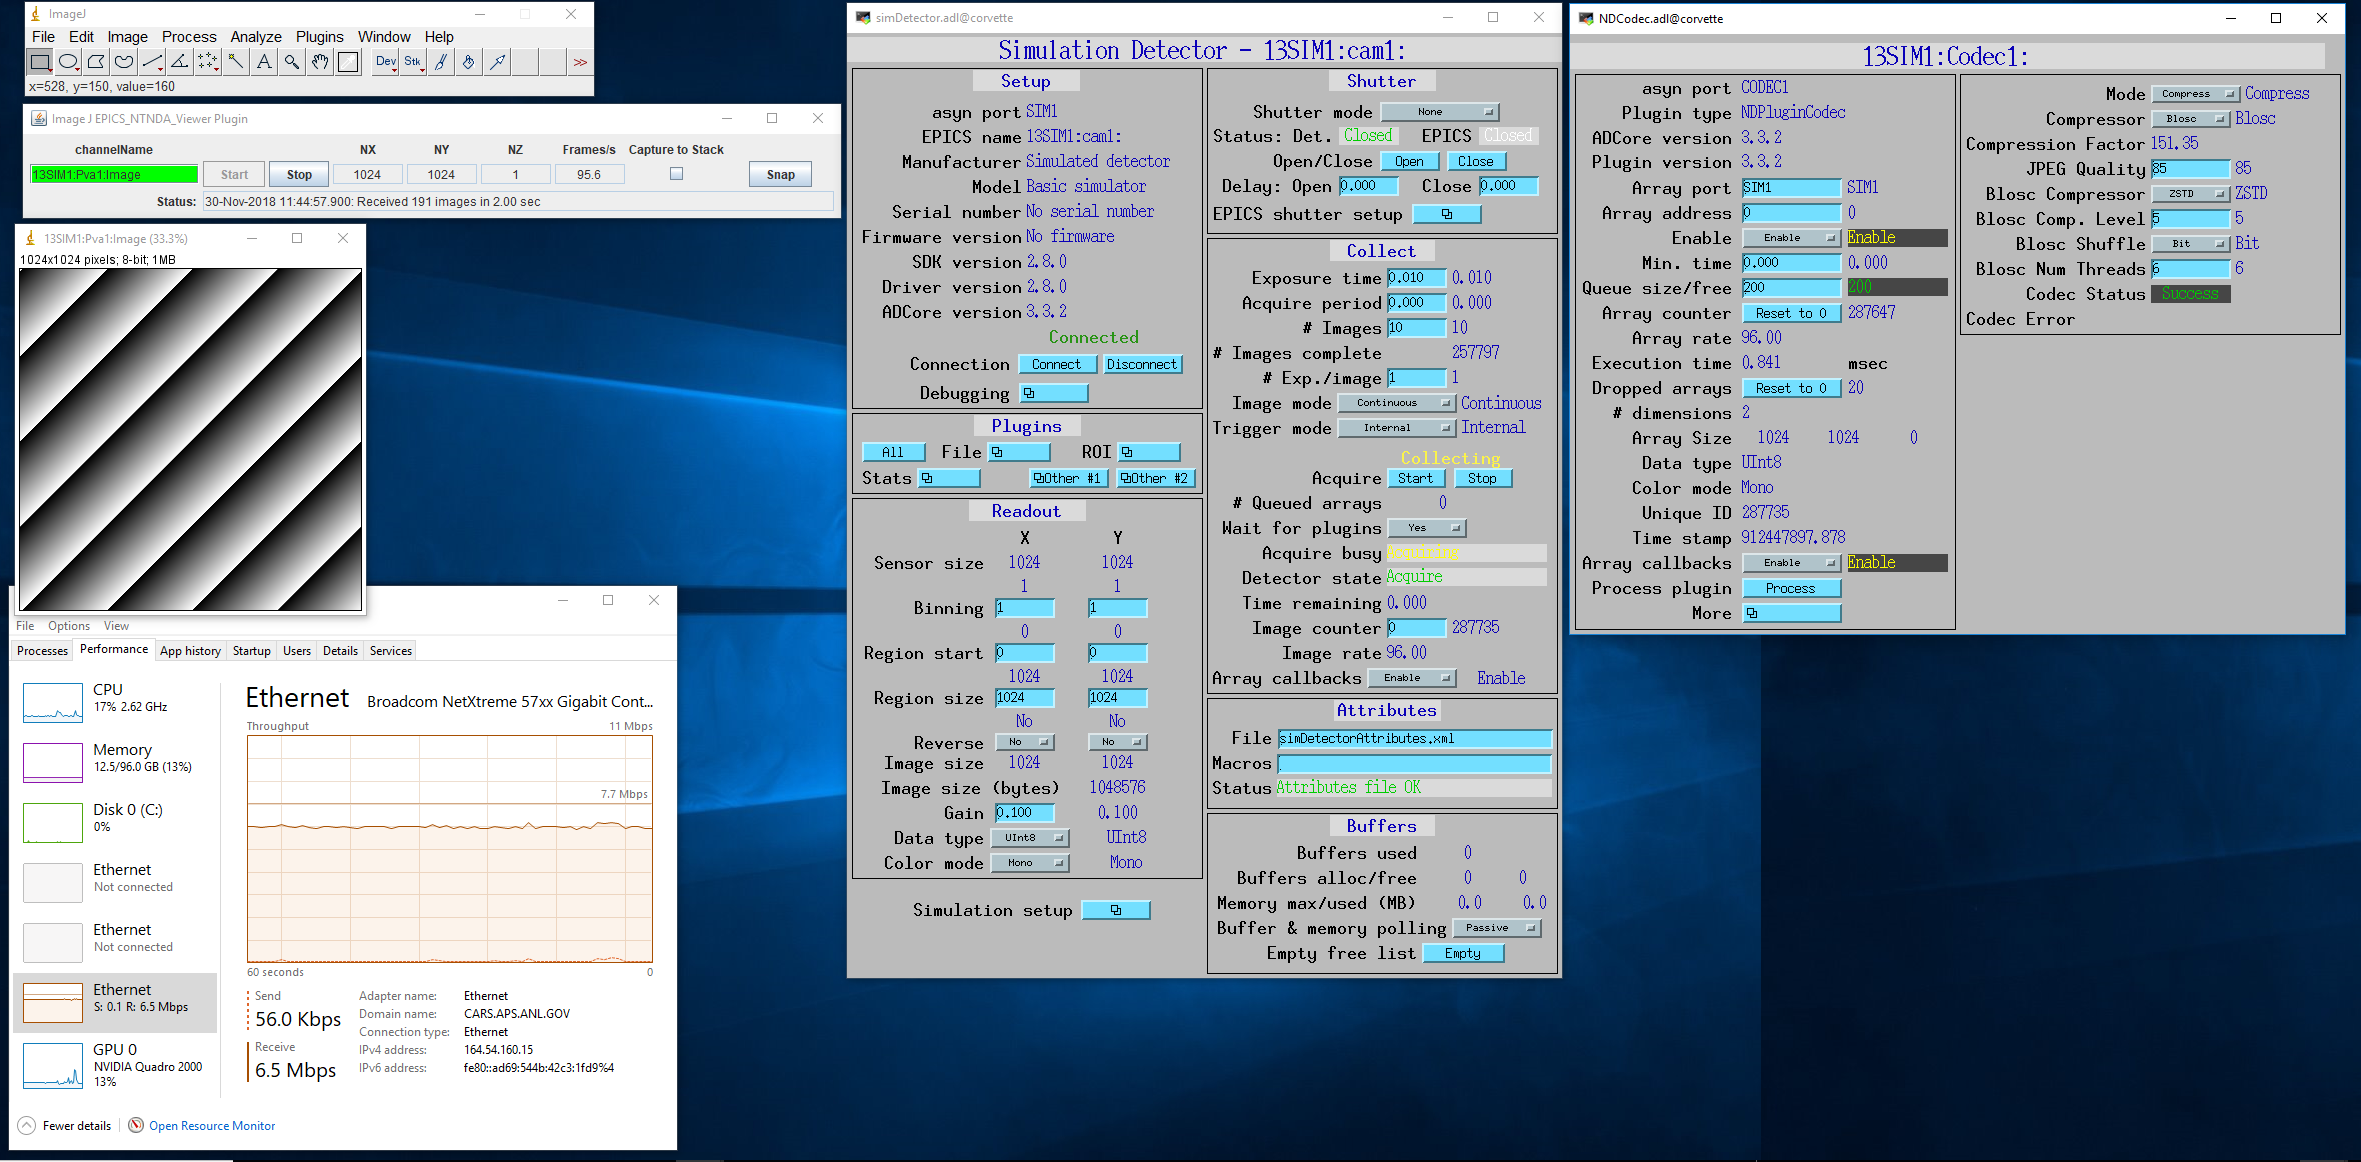
The following is a screen shot when using the EPICS_NTNDA_Viewer to display compressed NTNDArrays. The source is the simDetector running on a Linux machine, generating 1024x1024 UInt8 images at about 95 frames/s. This is about 95MB/s or 760 Mb/s. The NDPluginCodec is compressing using the Blosc ZSTD compressor with compression level=5 and Bit shuffle. Actually Bit shuffle does nothing in 8-bit mode, so this could also be None. There are 6 Blosc threads. The compression factor is 151, i.e. the output arrays are 151 times smaller than the uncompressed arrays. The Codec output goes to the NDPluginPva plugin which serves the NTNDArrays on the network. The ImageJ viewer is running on a Windows machine and is decompressing the arrays and displaying them at the full 95 frames/s rate. The Windows Task Manager Network Monitor shows that the actual network utilization is only 6.5 Mb/s, compared to over 760 Mb/s if we were transmitting uncompressed arrays. The Windows machine has 8 cores, and ImageJ is using approximately 1 core to decompress the arrays and update the display at 95 frames/s.
This is an ImageJ plugin which can be used to graphically control the following:
Normally this plugin will be used together with the EPICS_AD_Viewer plugin described above. However, that is not required. For example, the ImageJ window used with EPICS_AD_Controller could be a window read from a TIFF file that the detector previously wrote.
The detector and plugin chain can include any of the following elements and settings:
All of the above components are optional, they do not need to be present. However, the components that are present must be in the above order in the "viewing" plugin chain. In other words the Transform plugin must come before the ROI and Overlay plugins, and the ROI plugin must come before the Overlay plugin. For the Transform and ROI plugins there is a flag that allows selecting whether or not this plugin is included the plugin chain. Note that this flag does not control the plugin chain, rather it must be set to correctly reflect the actual setting of the plugin chain. It is possible to use EPICS_AD_Control to control the ROI without the ROI plugin being in the plugin chain. In fact this is a common use case.
The following is the EPICS_AD_Controller plugin control, located in the ImageJ "Plugins/EPICS_areaDetector/EPICS AD Controller" menu.

The following are the controls on the EPICS_AD_Controller screen:
When using EPICS_AD_Controller to define the camera readout region then the following rule must be followed. If the ROI plugin is in the viewing chain then it must first be set to pass the entire image, i.e. MinX and MinY must be 0, and SizeX and SizeY must be at least as large as the image from the camera. This can be conveniently done by pressing the "Reset ROI" button before defining the ImageJ ROI to select the camera readout region. This is not required if the ROI is not in the viewing plugin chain.
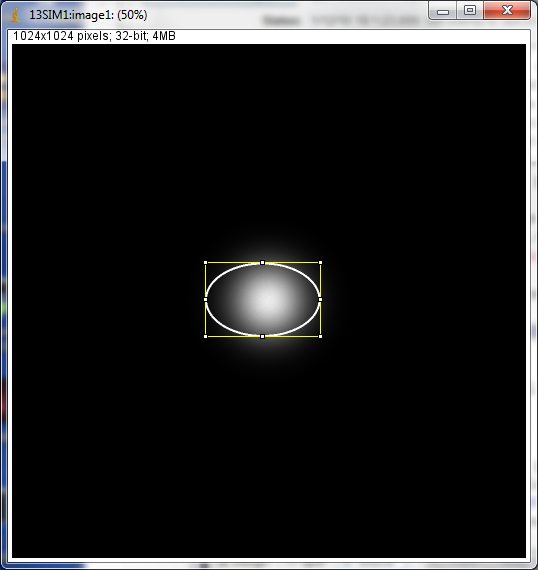
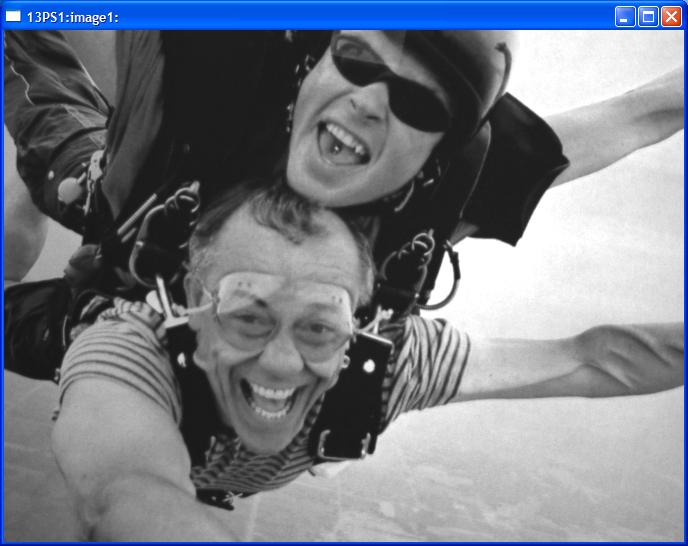
The following is the EPICS_AD_Viewer image display window with an ellipse overlay that was defined using an ImageJ rectangular ROI and EPICS_AD_Controller.
The EPICS_AD_Control plugin must be compiled in the same manner described for EPICS_AD_Viewer above.
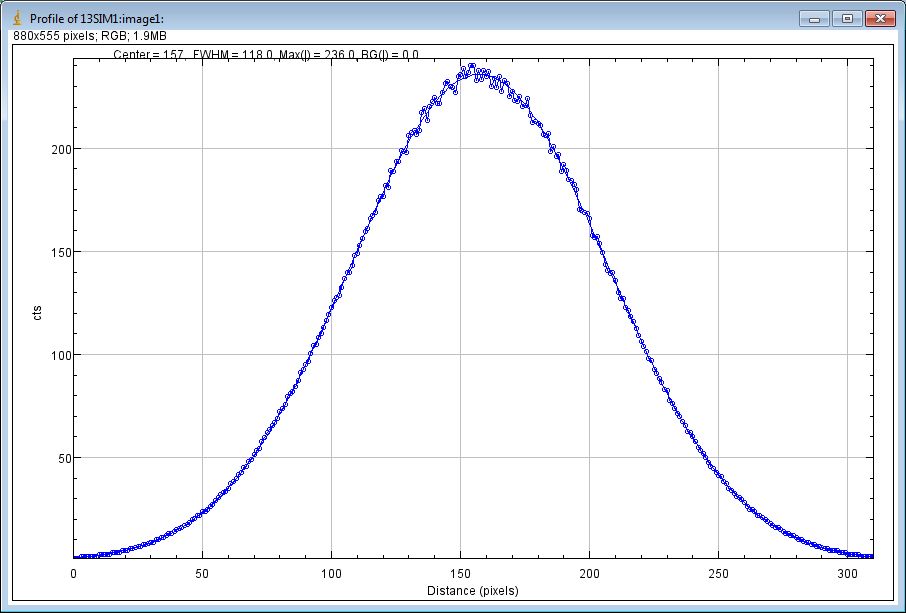
This is an ImageJ plugin which can be used to dynamically plot a line profile, fit the profile to a Gaussian peak, and print the fit parameters (centroid, amplitude, full-width half-maximum (FWHM), and background. It should be compiled in the same manner as EPICS_AD_Viewer described above. It is used by drawing a line or rectangle in ImageJ and then starting Plugins/EPICS_areaDetector/Gaussian Profiler.
The following is the GaussianProfiler window plotting the profile of the peak shown above in the EPICS_AD_Controller image.
There is an IDL procedure called
epics_ad_display that can be used to display 2-dimensional array data that
the NDStdArrays plugin sends to EPICS. This
IDL client is available as source code (which requires an IDL license), and also
as a pre-built IDL .sav file that can be run for free under the IDL Virtual Machine.
This IDL program can run on any machine that IDL runs on, and that has the ezcaIDL
shareable library built for it. This includes Windows, Linux, Solaris, and Mac.
epics_ad_display is included in the
CARS IDL imaging software. It is also available in the Viewers/IDL directory
in the areaDetector application.
The Viewers/IDL directory contains both the IDL source code and a standalone IDL file, epics_ad_display.sav, for the epics_ad_display GUI to display images from areaDetector detectors. This file can be run for free on any Linux or Windows system under the IDL Virtual Machine, which can be downloaded free of charge from ITT VIS. That directory also contains the shareable libraries used to call EPICS Channel Access from IDL (ezcaIDL.dll for Windows and libezcaIDL.so for Linux). Before using the IDL source code or .sav file it is necessary to define the environment variable EZCA_IDL_SHARE to point to the complete path to ezcaIDL.dll or libezcaIDL.so. For example on Linux:
setenv EZCA_IDL_SHARE /home/epics/support/areaDetector/1-5/Viewers/IDL/libezcaIDL.so
On Windows use
My Computer/Properties/Advanced/Environment Variables/
to add a new environment variable EZCA_IDL_SHARE to point to the location of ezcaIDL.dll on your system. To run the standalone IDL epics_ad_display.sav file without an IDL license execute the following on Linux:
idl -32 -vm=epics_ad_display.sav
On Windows simply double-click on the icon for the epics_ad_display.sav file.
When the GUI comes up type the base PV name for the NDStdArrays plugin for your detector in the "Base PV" widget. For example with the simulation detector supplied with the areaDetector application this is "13SIM1:image1:" (without the quotes). Once the detector begins acquiring images they should be displayed in the IDL window.
To run the GUI from the IDL command line on a system with an IDL license type the epics_ad_display command followed by the base PV name of the NDStdArrays plugin. For example:
IDL> epics_ad_display, '13SIM1:image1:'
The control window for epics_ad_display is shown below. It has a field
to input the base name of the EPICS PVs with the image data. It also has fields
to enable/display the IDL display update, to change the display mode, to autoscale
the intensity, and to invert the image in the Y direction. If autoscale is set to
No then manual scaling can be entered in the Min and Max fields. The number of frames
per second actually being displayed by IDL is shown. There is a status window that
shows whether the EPICS PVs are connected and the time the last was array received,
updated once per second.

epics_ad_display can use the simple IDL routine tv to
display the images. This is the fastest mode, and results in a non-scalable unadorned
window.
tv routine.
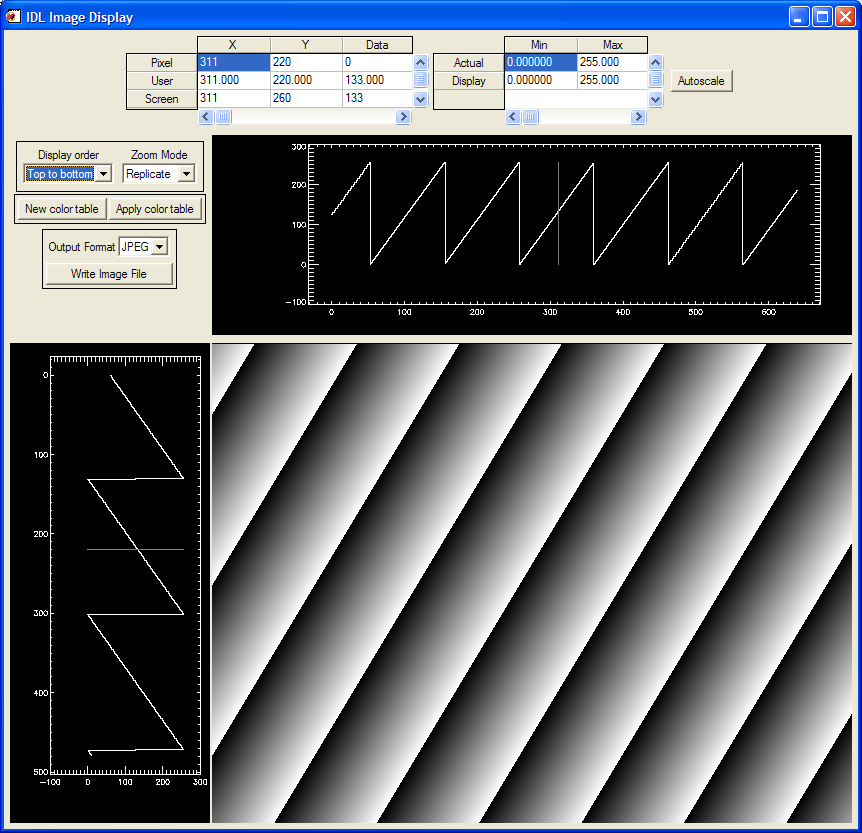
epics_ad_display can also use the routine
image_display.pro to display the images. This routine displays row and column
profiles as the cursor is moved. It allows changing the color lookup tables, and
zooming in (right mouse click) and out (left mouse click). Note that image_display
is not currently capable of displaying color data i.e., RGB1, RGB2, or RGB3 NDArrays).
It can however, display Mono data in false color. The following is an example of
image_display displaying an image from the simulation detector.
The Viewers/IDL directory also contains an IDL function to read the areaDetector netCDF files. This is described in the NDPluginFile netCDF documentation.
If the ImageJ or IDL viewer is not displaying new images as the detector collects them check the following: